note (2026): In late 2024 I moved on from picoCMS but it served well for some years. Read more in Site History
This site has undergone a fair amount of change over the years. I've tried to keep a changelog of sorts every time I've moved the furniture around. See the Site History page for more details about the various software I've used. Most recently I was using a self-hosted Wordpress install. While some things became easier with Wordpress - from simple site search and tagging to widgets and full site statistics I found that over time I was actually writing less and less mainly because it put a slow, bloated website between me and the final product. Wordpress was simple to use - you don't really need to know anything about the technologies it employs to use it to publish to the web - but there's a certain amount of "latency" involved in its daily use.
Wordpress workflow didn't fit how I wanted to work
I found that most of the time when I wanted to write something I would open a text editor and save it somewhere on my local machine. I'd work on it for a while and when I thought it was ready I'd copy and paste it into the live Wordpress install. I would inevitably find something wrong with it, or there would be a comment that would make me re-think what I had written and I would need to update the post. The original file was now out of sync with the one in Wordpress. Wordpress had become the system of record.
Yes, I'm aware of various other means that might be employed to publish to Wordpress and have tried a few of them but what I wanted was to be able to maintain my posts in plain text (preferably markdown) in a folder structure that made sense to me and control and publish those documents to the web using git.
Security
It was also a huge pain in the ass constantly worrying about updating Wordpress (to say nothing of the many plugins I used over time) and it slowly became much more of a hassle than I was interested in dealing with. I wanted to just write again.
To DB or not to DB that is the question
The 900 separate blog posts I had written since 2002 existed solely as data in a database. The things that having a database offers include search, grouping like posts or providing a means to offer similar posts to the reader through the use of keywords or tags associated with the post. These are things which make it easier for readers of the site - to find more things I've written that they might enjoy - but it doesn't help me write anything new. Also, all of my posts were locked up in a database running on a remote server. I had backup copies of the database of course and I could certainly set up a local webserver, install PHP and a mysql database, configure it all and import that database if I wanted to run a local copy of the site - but this was a far cry from having my posts in plain text files that I could open on any machine with or without a local web server. Between all the core functionalities and hundreds of available plugins for Wordpress my desire for a more minimalist web publishing workflow was going to be a big change.
Exporting my posts
The first step was to export my posts from the Wordpress database using the Wordpress XML export function (in Tools | Export). Thankfully Wordpress as an open source project values the rights you have to your own data. Try getting all of your images or posts out of facebook when you decide you want to use something else. I used the selection to not include media with the posts since I was just going to move my uploads folder manually.
Converting the XML to markdown
Right now at home I don't remember what I used exactly. I converted the file at work on a Windows 7 machine and I'm fairly sure I used the pre-compiled version of wpXml2Jekyll. I'll update the post later if I find I was wrong. The resulting .md files had a lot of different types of markup which would need to be reviewed and standardized no matter what I ultimately decided to do with them.
Choosing PicoCMS
Over the last year I had tested out a bunch of different approaches to flat file web publishing: Jekyll and Grav among them. Grav was closer to what I wanted and while I actually ran Grav in a subfolder of the site for a few months I found it a bit confusing. I was really looking for something very simple and more like Blosxsom which still runs my notes page. PicoCMS is a simple set of scripts that gets me very close to what I wanted.
Setting up pico was very easy and the docs should be sufficient if you're interested in setting it up yourself. So far I've only needed one additional plugin - Pagination which provides some next and previous page functionality on long lists of posts.
The markdown header
The exported markdown posts now had a nice YAML header:
---
title: Firefox 55+ crashing on armv7
date: 2017-12-02 15:12
author: Nate
category: [chromebook, firefox, Technology]
---
The variables in that header can be accessed when processing a page. I currently don't have a plan for how or if I'll use the comments and categories variables but its nice to know there were comments on the post at one time and what the tags were I had assigned in wordpress at the very least. I decided not to bother with trying to preserve associated comments because I intended to integrate Disqus for commenting going forward. I prefer that commenters own their own comments and to not end up being the steward of another person's writing again.
Out on a limb with twig
Pico builds web pages with twig templates and I wasn't familiar with it. If you grasp the idea that web page content (the text you read) can be separate from formatting (how it looks), twig just provides a further abstraction for laying out a page when processing content. Twig is like a page skeleton to which CSS and content can be applied to generate the final HTML page you see in the browser. The twig homepage makes the case for itself, but I can only say that it was easy enough to get the site set up pretty quickly once I understood what was going on.
Is themeing a word?
Before I could really get to work I had to decide on a theme to use with pico. Since I already have some experience with Bootstrap that seemed a natural place to start. I selected the clean_blog theme which is bootstrap based although there were several bootstrap based themes available.
I got rid of the minimized versions of the css provided for now. I made some minor cosmetic changes but its obviously still very similar to stock. As I worked on it I took bits and pieces of the various twig files out and created little snippets of text which could be shared across several pages and named them as .thtml (a practice I got from geeklog and still use). These are included as needed. For instance, the navigation bar along the top is something all the pages share so it made sense to have that as a single file. I include that in any twig file with:
{% include 'nav.thtml' %}
I wanted to have a drop down menu for all those pages which have no place being across the top of every page. To get that working I needed to include a couple javascript libraries (I used local versions and include them on all the pages using the same method as above): namely bootstrap.js and jquery.js. Some quick markup in my nav.thtml file and some tweaks to the clean_blog.css file makes a fairly serviceable menu. Here's a few lines from my nav.thtml file:
<div class="navbar-header page-scroll">
<div class="dropdown">
<a href="#" data-toggle="dropdown" class="navbar-brand">Menu<b class="caret"></b></a>
<ul class="dropdown-menu">
<li><a href="{{ base_url }}">Home</a></li>
<li><a href="{{ base_url }}/about">About</a></li>
Marking up my markdown
Many of my newly-minted textfile posts referenced images found in the uploads directory inside the wordpress install which I was going to delete. I moved the uploads folder out to the web root, but I still needed to update the posts to point to this new location. Back on my linux machine I used sed to process all of the documents and replace the absolute path from wordpress with the variable twig uses % base_url % for the web root (without the spaces):
sed -i 's/mydomain\/blog\/wp-content/% base_url %/g' *
Also, most of the links to images in my posts weren't explicitly classed and the theme I was using in Wordpress was not Bootstrap. I ended up just classing every instance of <img src= to add the class which sets the image on the right side of the page.
sed -i 's/<img\ src=/<img\ class="pull-right"\ src=/g' *
When I realized that not all images needed to be aligned right, but sometimes there was an image at the top of the post that I wanted to be the width of the page, I ended up manually going through and deleting that class from a lot of posts. However, I didn't consider responsive design and ended up having to run this to add the Bootstrap class which basically sets width to 100%.
sed -i 's/<img\ src=/<img\ class="img-responsive"\ src=/g' *
Hey, you said this was a markdown parsing project but thats all HTML?
There is so much HTML in the original posts that I probably won't be re-writing them all in markdown unless the mood strikes me on certain posts. Luckily PicoCMS will also parse HTML so I can really just leave them as is.
More about images
Images are another open question at this point. Wordpress had a media manager which is basically a set of scripts that takes your uploaded image and processes it to make some number of resized versions which it stores away (by date) in various folders in that uploads folder. This is nice because you don't have to mess around with resizing images, but its not nice because you end up with a bunch of resized images you probably don't need.
I've also got a nice piwigo installation which I quite like using that perhaps I should work into the workflow for blog posts. If its important enough to write about perhaps it belongs in that gallery? But at the same time it would be simpler to just have a script which resizes images and files them by date in my new unfettered-by-wordpress folder. That will require some thinking and coding so for now I'll probably just use Gimp to create appropriately sized images and dump them in the uploads folder by date (probably year and not year / month as wordpress did). Open question. I didn't even really have any screen shots I felt important enough to bother with for this whole story.
Now that I've been working with it for a while, I've ended up doing the following: Since I came from Wordpress, I simply moved my wp-content folder over and renamed it as uploads. Now when I want to add an image to a story, I create a 300px wide image for inclusion in the body of the text and include it using either HTML as above or the markdown version of the same with added style to have the file aligned right. If I want to have a larger image linked, I'll create a larger version and add a hyper link for it. Both of these images are stored in my local uploads folder (which has subdirectories by year, mainly because of the holdover wordpress convention but it does make it easier to find things so I've kept it) and I name the files with the file name convention I've decided on for the posts (YYYY-MM-DD-name-with-hyphens.jpg/png). Then I run a bash script to rsync my local uploads folder to the one up on the web server. I've found this is the one place where it really is a good idea to be able to see what the page is going to look like before committing it and having it go live.
Seeing the result in a browser
Since I'm not composing pages in a WYSISYG editor (like a typical Word Processor), the perfectly readable markdown may not render as expected when it is converted to HTML in your browser. Unless I go check, I would not know. To see what the page is going to look like (and check that links work and images are correctly positioned) I install PHP (in linux this is as easy as sudo pacman -S php in arch or sudo apt install php in ubuntu) and start the built in PHP web server in the picocms directory. Then I can load up the site locally at localhost:8080 and its worked pretty well to let me view the rendered pages in my web browser and generally saves me another commit or two to fix obvious typos.
note: using the built in PHP web server took some additional steps
Because on some machines I don't want to bother installing and setting up Apache, but I do have PHP installed, the apache .htaccess rules won't work. These are required for picocms to be able to display most of my content due to my setup choices. I set up a script in my home directory to start the server (which should only be used for development purposes!) called runweb which changes directory into the main picocms directory and then issues the command: php -S 127.0.0.1:8080 routing.php
This solution from: https://github.com/picocms/Pico/issues/325
<?php
# routing.php - placed in main picocms folder
# .htaccess denies a bunch of directories
if(preg_match('/^\/(config|content|content-sample|lib|vendor)\//', $_SERVER['REQUEST_URI'])) {
        # Return 404
        $_SERVER['QUERY_STRING'] = '404';
} else {
        # .htaccess allows direct access to any files
        # (as long as they're not in the directories denied above)
        if (file_exists(__DIR__ . '/' . $_SERVER['REQUEST_URI'])) {
                return false; // serve the requested resource as-is.
        }
        $_SERVER['PICO_URL_REWRITING'] = 1;
        $_SERVER['QUERY_STRING'] = urlencode($_SERVER['REQUEST_URI']);
}
include __DIR__ . '/index.php';
setting up git repos
I created two bare git repos on my server: one for my content directory and the other my custom theme. I cloned these repos out to my local machine and populated them and committed them back. Then I set up a post-receive hook in each to automatically refresh the two associated directories.
#!/bin/sh
GIT_WORK_TREE=/home/user/mydomain/content git checkout -f
and
#!/bin/sh
GIT_WORK_TREE=/home/user/mydomain/themes/mytheme git checkout -f
This way, while I'm not tracking the entire site the two folders I'm working in the most are under revision control and I have a repo for just my documents and just my theme. In case I decide to move the stuff again I won't have to bother with splitting up the repo at a later date.
Commenting and Contact Form
I have always allowed comments on my site but have used different methods over time. Folks have made comments on posts in the past and I'd like to preserve them (and I do have them all) but I stil have to think more about how best to do that. I could just append the comments to the posts so that they live as part of the post going forward or I could code up some kind of artificial comment block which sits at the bottom of the post. In any case I decided early on that I wanted to integrate Disqus again for commenting. I don't like having to deal with spam in comments (something Wordpress' Akismet is quite adept at blocking but a concern nonetheless) or being the steward of other people's comments on my own site. Here I am 16 years later worrying about whether and how to preserve something someone posted as a reply to something I said that long ago? Disqus provides a means for commenters to have some amount of control over what they write on other people's sites. To say nothing about having to be accountable for hosting random internet guy's comments on my personal domain. Luckily Disqus announced last year that advertising would remain optional for sites like mine so I'm willing to continue using them. The moment they force some click-bait-ey ads into my reader's faces they're gone.
The Contact form is another entry point for spam. I don't want to hack together a comment form (as I've done many times before) which I then have to worry about being exploited and possibly ending up being used to send tons of spam hither and yon and getting my server blacklisted. There were plugins for pico to provide a comment form, but after reviewing them they seemed little better than what I could do myself. I settled on a quick and dirty solution and embedded a Google form on a contact page. I still have to work out the theme for it a bit so that its more responsive, but it works and I have Google's spam filtering which is probably even better than Akismet was.
The publishing workflow
So now writing stuff for the website works like this: I have a couple template markdown files with different versions of the YAML header for blog posts or general pages and I make a copy of one of these and modify the headers to start writing a new post.
- The /blog subdirectory is for "posts" (like this one) and is based on the date variable in the header (reverse chrono order). If I don't assign the Date: field the post won't show up on the Blog page which is handy when I'm working on something but am not ready to "publish" it.
- The template: field makes the post render in different ways by running it through different twig files. For example a normal blog post is assigned the value "blog" which uses the blog.twig file. If I use the value "hidden" it runs the post through the hidden.twig file which doesn't pass any of the content and instead just prints a sad line about the post having been removed. This is handy if I want to keep a post in the repo (I want to keep them all obviously) but I want to remove it from general viewing. As it is today the title and date still appear in the listing, just the content disappears.
- If I define the optional img: field I can override the header image. I may do this for a political posts for example because the default image of a bunch of SATA drives in a server doesn't make much sense for a political rant.
-
For my music pages I set up another subdirectory /music which serves as an index to all the music pages which have a template: type set to "music". I defined a custom YAML header named thumb: that I add to each of the posts and I just enter the filename of the thumbnail I want to use for each page. The thumbnails are all stored together in a single folder named img in my theme directory and are called out for in the music index page twig file.
{% for page in pages|sort_by("page.meta.year") %}
{% if (page.id starts with "music/") %}
 <div class="post-preview">
   {% if not (page.meta.template == "music") %}
     <a href="{{ page.url }}">

       <img class="pull-right" src="{{ theme_url }}/img/music/{{ page.meta.thumb }}">

         <h2 class="post-title">
             {{ page.title }}
         </h2>
         <h3 class="post-subtitle">
             <strong>{{ page.meta.year }}</strong><br /><br />
             {{ page.description }}
         </h3>
     </a>
     <br />
     {% endif %}
 </div>
<hr>
{% endif %}
{% endfor %}
note: some edits and additions made Mar 31, 2018
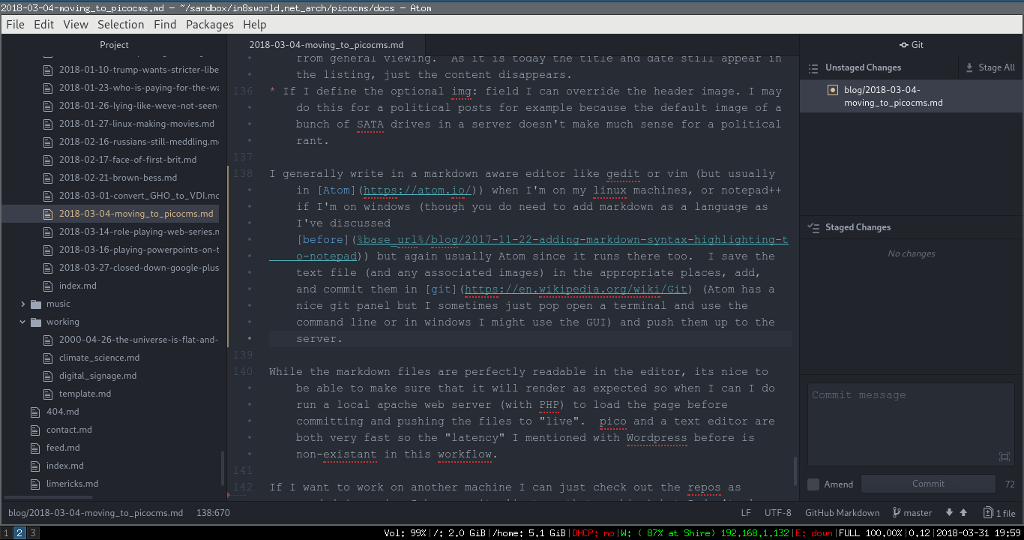
I generally write in a markdown aware editor like gedit or vim (but usually in Atom) when I'm on my linux machines, or notepad++ if I'm on windows (though you do need to add markdown as a language as I've discussed before) but again usually Atom since it runs there too. I save the text file (and any associated images) in the appropriate places, add, and commit them in git (Atom has a nice git panel but I sometimes just pop open a terminal and use the command line or in windows I might use the GUI) and push them up to the server.
While the markdown files are perfectly readable in the editor, its nice to be able to make sure that it will render as expected so when I can I do run a local apache web server (with PHP) to load the page before committing and pushing the files to "live". pico and a text editor are both very fast so the "latency" I mentioned with Wordpress before is non-existant in this workflow.
If I want to work on another machine I can just check out the repos as needed (assuming I have a git client on that machine) but I don't always have a local webserver (especially on Windows). I've tested checking out on android using Termux and it worked well (once git was installed and the built in script to set a symlink to the external SD card was run). I'm editing this post right now on a Chromebook in a Chrome app called MME (a markdown editor) and checking in and out under crouton though I think I could have used the normal chrome terminal with the right tools.